Monday, June 26, 2017

Beggin' For Cake! Chocolate Birthday Cake with Cream Cheese Frosting (Vegan & Allergen Free!)


My son vividly remembered me making this cake for his 6th birthday and sadly it took me another year to bake this cake again. After one slice he was hooked again! He would NOT stop begging for this cake!

Prep time: 15 mins | Cook time: 25 mins | Total time: 40-60 mins (see recipe) | Serves: 10

Ingredients

Cake
2 cups (473 ml) of your favorite plant based milk
2 tsp apple cider vinegar
1 1/4 cups (10 oz) unsweetened applesauce
2/3 cup (158 ml) oil
2 tsp pure vanilla extract

2 1/4 cups (320 g) unbleached all-purpose flour
1 cup (118 g) unsweetened cocoa powder
2 tsp baking soda
1 tsp baking powder
1/4 tsp salt
1 1/3 cups (268 g) sugar

Frosting
1 (8 ounce) package Toffuti cream cheese, room temperature
1/3 cup (76 grams) Earth Balance sticks, room temperature
1 teaspoon vanilla
2 cups (256 g) powdered sugar

Directions

Cake


  • Preheat oven to 350°F (176 C) and lightly spray pans.
  • Mix the milk and vinegar in a large mixing bowl.
  • Add the oil, coffee, vanilla extract, and applesauce and beat until foamy.
  • Sift flour, cocoa powder, baking soda, baking powder, and salt into a smaller bowl.  Whisk in sugar. 
  • Add dry to the wet mixture while beating. Beat until no large lumps remain. It should be creamy and pourable. 
  • Pour batter into cake pans.
  • Bake 25-30 minutes, or until a toothpick inserted into the center comes out clean. 
  • Allow cake to cool in pans for 7-10 minutes.
  • Place rack on top of cake and flip. Repeat for each pan and allow to cool completely. You can wrap in plastic wrap and refrigerate overnight for even better crumb coat
Frosting
  • For frosting, beat cream cheese and Earth Balance. Add vanilla. Add sugar.
  • Frost the top of one of the cake layers. 
  • Place the second layer on top and add a thin coat (crumb coat) of frosting to the entire cake. 
  • Refrigerate or freeze to harden. 
  • Apply the rest of the frosting and refrigerate or serve immediately!
Additive Free Decorating

Since my little guy has so many sensitivities, I avoid adding anything unnecessary to the cake, and that includes creepy decorative icing with synthetic dyes. Since my oldest was little, we've built them a new Lego as a decoration for their cake. The past two years, I enlisted my oldest to build it! I even found a little Happy Birthday! I know it's not the most beautiful cake in the world, but my guy was ecstatic over it. I also reminded him that not many kids get a homemade cake these days!

Wednesday, November 30, 2016

Allergen Free Thanksgiving

Allergen Free Thanksgiving Recipes & Tips


Turkey
Refrigerator Thawing
Plan ahead: allow approximately 24 hours for each 4 to 5 pounds in a refrigerator set at 40°F or below.
Place the turkey in a container to prevent the juices from dripping on other foods.
4 to 12 pounds — 1 to 3 days
12 to 16 pounds — 3 to 4 days
16 to 20 pounds — 4 to 5 days
20 to 24 pounds — 5 to 6 days
A thawed turkey can remain in the refrigerator for 1 or 2 days before cooking. Foods thawed in the refrigerator can be refrozen without cooking but there may be some loss of quality.
Cold Water Thawing
Allow about 30 minutes per pound. First be sure the turkey is in a leak-proof plastic bag to prevent cross-contamination and to prevent the turkey from absorbing water, resulting in a watery product. Submerge the wrapped turkey in cold tap water. Change the water every 30 minutes until the turkey is thawed. Cook the turkey immediately after it is thawed.
4 to 12 pounds — 2 to 6 hours
12 to 16 pounds — 6 to 8 hours
16 to 20 pounds — 8 to 10 hours
20 to 24 pounds — 10 to 12 hours
A turkey thawed by the cold water method should be cooked immediately. After cooking, meat from the turkey can be refrozen.
Microwave Thawing
Follow the microwave oven manufacturer's instruction when defrosting a turkey. Plan to cook it immediately after thawing because some areas of the food may become warm and begin to cook during microwaving. Holding partially cooked food is not recommended because any bacteria present wouldn't have been destroyed.
A turkey thawed in the microwave must be cooked immediately.

  1. Rinse turkey and remove the neck AND GIBLETS!!!!!  Yes, they are in there somewhere! 
  2. Cover the turkey with oil and salt.
  3. Roast in oven.  Cover with thick foil until last 30 minutes.

a.       Plan on 20 minutes per pound in a 325 convection or 350 degree F oven for a defrosted turkey and 10 to 15 minutes per pound for fresh.  To kill all bacteria, a turkey must be cooked to an internal temperature of 165°F. According to the U.S.D.A., the bird must reach this temperature before you take it out of the oven. As it rests, the temperature will then continue to rise to around 180°F. For juicier meat, however, some people prefer to take the bird out at 150°F so the temperature will rise only to 165°F as it rests. This is less of a risk if you get an organic or heritage bird, which is less likely to contain harmful bacteria.
b.      Insert the probe into the thickest part of the turkey's thigh, being careful not to touch the bone (which will skew the reading). The thigh is the best place to test because it takes the longest to cook, but to be on the safe side, it's smart to also take the turkey's temperature underneath the wing.
c.       When the turkey has reached the desired temperature, it's essential to let it rest for at least 20 minutes before carving. This gives the juices time to settle into the bird and be reabsorbed; carving it up too soon will just allow the moisture to run out, leaving you with dried-out meat on top of a puddle on your carving board. If the breast and thighs have reached a temperature of 165°F, it is not necessary to cover the turkey with aluminum foil while it rests. However, if you've taken the bird out at 150°F or you want to hold it for longer, tent it with foil after 20 minutes to make sure it doesn't cool down too much. Tented with foil, you can leave the bird in a warm place for up to 40 minutes, which gives you plenty of time to make the gravy.

Gravy
Lightly tent turkey. After drippings cool, add ½ -1 cup (1 cup for 20 lb.) flour.  Cook until flour taste gone.  Continue to cook on low and add water little at time.

Mashed Potatoes
Use small potatoes with thin skin (yellow is good, or Yukon).  Use vegan butter sticks and unsweetened vegan milk.  Use more butter than milk.

Stuffing
6 cups bread (Start saving all the dry pieces of bread in the freezer.  Let the bread dry out first.  Cube bread.)
1 onion, diced
3 stalks celery, diced
Optional: 2 large carrots, diced
Rosemary, ¾ tsp fresh or 1⁄4 dried teaspoon
Thyme, ¾ tsp fresh or 1⁄4 dried teaspoon
Sage, ¾ tsp fresh or 1⁄4 dried teaspoon
Parsley, ¾ tsp fresh or 1⁄4 dried teaspoon
1⁄2 teaspoon salt
1 3⁄4 cups broth

1.       Preheat oven to 325 degrees F.
2.       Cut the bread into small pieces, like regular stuffing.
3.       Combine rosemary, thyme, sage, parsley, and salt in a separate container. Chop all vegetables.
4.       Warm a small saucepan and sautĂ© the onion, celery, and carrots over medium heat with 1/4 cup broth (Add the broth it little by little so the vegetables don't stick you may not need it all). Add these veggies to the bread. Add the herbs to the bread as well.
5.       Drizzle the vegetable stock over the bread and veggie mixture. Mix well.
6.       Bake, uncovered for 20-30 minutes at 325 degrees.

Cranberry Sauce
2/3 cup sugar
2-3 cups cranberries
2 apples
1 orange juice & zest
Optional 1 oz. port
2 star anise (1 = ½ tsp anise seed)
4 cardamom pods
Simmer 5-10 minutes.  Refrigerate.

Sweet Potato Soufflé
4-5 sweet potatoes
½ stick butter
¼ tsp salt
1 cup of sugar (or to taste)
1 tsp vanilla
Optional cinnamon (1/2-3/4 tsp)
Peel, quarter boil potatoes starting from cold water until tender. Mash, combine, and sprinkle brown sugar on top.

Scalloped Spinach
2 packaged frozen spinach defrosted
4 TBL finely chopped onion
Daiya cheddar shreds to taste (not too much)
Salt & pepper to taste

Bake 30 minutes @ 350.

Cranberry Bread
1 cup safflower oil
1 cup applesauce + 1 cup pumpkin
1-2 cups sugar
2/3 cup orange juice + water to consistency
Orange zest
3 1/3 cup flour
2 tsp baking soda
½ tsp salt
1+ cup cranberries

Bake 325 convection or 350 until toothpick comes out clean.

Amish White Bread

Baby Lima Beans
Simmer for 1-2 hours.

Roasted Brussel Sprouts
Peel Brussels until black removed.  Slice consistently in half.  Toss with olive oil and salt.  Roast 400.


Wednesday, May 18, 2016

Allergen Free Vegan Pancakes

Our go to weekend breakfast is pancakes. I love that they doesn't taste like a vegan knockoff AND can actually have some nutritional value. Even though my kids love cinnamon rolls, there's really nothing more to them than flour and (vegan) butter.

We ALL love these pancakes especially with some chocolate chips or cranberries!

Orange Carrot Pancakes

Serves 4

Dry Ingredients
2 cups flour
1 tsp baking soda
4 tsp baking powder
½ tsp salt
2 TBL sugar
1 large carrot, peeled and finely shredded or vitamixed into some of the liquid
1 zest lemon (optional)
1 zest orange (optional)

Wet Ingredients
2 cups total liquid (water with at least 1/4 cup real preservative free orange juice or lemon juice)
3 TBL oil
1 tsp vanilla

Preheat pan to low-medium heat (1 notch above simmer).  Combine dry ingredients.  I love to use the vitamix to liquefy the carrot into some of the wet ingredients to really hide the carrots.  Add liquid ingredients. Whisk until just mixed.  Drop ¼ cup of batter into pan and add toppings (we love sliced cranberries or chocolate chips).  Covering the pan (cracked to allow steam to escape) helps cook the pancake.  Cook for 3-4 minutes until bubbly and edges are cooked.  Cook 2-3 more minutes after flipping.  

Basic Vegan Pancakes

2 cups flour
1 tsp baking soda
4 tsp baking powder
½  tsp salt
2 TBL sugar
cups water
3 TBL oil
1 tsp vanilla

Wednesday, April 6, 2016

Our Tiny Trailer

Our RV journey has been a long one.  My parents had a lot of different styles of camper over the years.  I knew a pop up was too much work (set up and take down), so we wet our feet with a used hard trailer with pop out beds. It was roomy, but didn't stay warm or cool well and wasn't sound insulated.


Antiqua

We searched for the right camper to meet our needs and listed the Antiqua for sale. Our criteria for the second camper was no canvas, 3 beds, and light enough to be towed by a V8 Toyota 4Runner.  We chose the V-Cross Vibe.


Vibe (with the Hensley Hitch)

Our first ride home was probably an omen - we immediately had sway issues and returned to the dealership to have them adjust the sway bar.  Later we upgraded to a Hensley hitch which is an amazing contraption that completely resolved our sway issues.  Once we'd used the camper a bit, we found that we disliked that we couldn't load the refrigerator with the slide out in, it was dark inside, and took too long in set up and take down.  We realized that what took the longest was setting up and cleaning out the septic, which we didn't really need anyway.  We mostly used the bathhouses because trying to bathe 4 people in one tiny camper isn't very efficient anyway. In the end, the biggest issue was that it was a little heavy for our Toyota 4Runner which meant it was more costly and difficult to tow long distances especially on steep mountain grades. We went back to tent camping and decided to sell or trade it in.


Big Agnes + Target Tent in WV

Though difficult in many ways, tent camping was good for us. It helped us realize what our trailer wants really were: hard walls for sound and temperature insulation, heating and air conditioning for all weather camping, comfortable beds that could stay set up, and a bright, happy interior.


After months of researching tiny trailers, we found the perfect trailer: the Great West Vans/Sterling RV Sidekick (formerly known as Trillium). We had considered similar models like the Scamp but the Sidekick quality/fit/finish was much more appealing.  We almost bought the 1300 but thankfully went with the 1500 with a 54" wide bed/table instead of a 47" wide bed/table. 


Sidekick 1500

We've been so happy with this little guy.  No more waiting in line to clean septic lines in the camper.  We bought a glorified bucket for those urgent night runs, but usually we just go in the woods.  We were able to pick out our flooring, faucet, and fabric which REALLY made the interior feel homey to us. The salesman's mother even made blackout curtains to match the upholstery fabric!


Sidekick Table / Bed

The table becomes the bed, but we leave the bed assembled and eat at the picnic table at the campsite.  It's nice to have  a table inside if it rains or the temps are very high or low, but most of the time we just eat on the master bed if it's too cold outside.


Sidekick Kitchen & Bunks
The bunk folds down to make a couch, but we those beds in place also.

We've had a few minor complaints but overall we still love this trailer!

Monday, April 4, 2016

Boondocking Tiny Trailer Style

We started visiting Obed years ago.  We stayed in a hotel a few times and then camped at 3 different RV parks.  I hated having to drive 30 minutes from the RV park to the crag.  We've always wanted to try Del & Marte's at Obed and now that we had our tiny camper we finally we did it.  Our little guy suffers from many allergies so we usually bathe him after crag days so that he can sleep clean.  We wondered if we could make it three days with no showers but it was cool enough that he could wear pants and stay relatively clean. The rest of us somehow managed to get through the trip without stinking to high heaven.  We enjoyed the awning one more morning when it sprinkled.  


I was so excited by the freedom of boondocking (ok, technically it was dry camping since it is a campground, but boondocking is such a fun word!)  The only thing I missed that RV campgrounds offer are picnic tables.  Otherwise, it was going beautifully until the second night.  Unbeknownst to us, the battery had gotten so low that our propane detector started going off intermittently all night long.  We had considered climbing that morning but we were too tired and cranky.

Once home I immediately started researching ways to deal with power consumption while boondocking.  I found out that our camper did not have the ideal type of battery (deep cycle).  We also need to make sure we have enough blankets or sleeping bags to leave the furnace off. We could also significantly reduce our power consumption by eliminating all of our incandescent bulbs with LED bulbs.  Even better, we can use them when we need them without feeling guilty or fearful about it. 

There are more benefits to using LEDs besides the very low power consumption - longer lifespan, less heat creation, and they contain no mercury.

Bulb Type
I took pictures of each bulb type to aid in my search.  My tiny trailer uses 921 in the lights over the beds and 1141 over the sink.

Typical Incandescent 921 bulb specifications:
17.9W / 1.4A / 2800-3000 K / 105 Lumens

Typical Incandescent 1141 bulb specifications:
18.4W /1.44A / 2800-3000 K / 104 Lumens

Wattage
Wattage is how much power the bulb consumes.  A 3W LED bulb will give you roughly the same Lumens as a 15W incandescent bulb (1:5). A panel that focuses all of the light would be more like 1:6 or 1:7. 

Brightness (Lumens)
LED bulb brightness is calculated rather than measured.  However, the calculated lumens and visible light are not the same.  Bulbs with all LEDs face in one direction will provide more brightness than multi-directional (but won't look as much like an incandescent.)


Color

The three common ranges of color temperature for light bulbs are Soft (or Warm) White, Bright (or Cool White), and Daylight.


A color temperature of 2700–3600 K is generally recommended for most indoor general and task lighting applications.  Incandescent lights are typically about 2700 Kelvin.  The yellower color is achieved in most LEDs by applying phosphor to blue LEDs.

I plan to purchase soft white because I want bulbs that look as similar to incandescent as possible.

Lamp configurations (Overhead or Multi-directional)
During my search, I found flat plate and multi-directional configurations.  I decided to use multi-directional as they produce light more like an incandescent lightbulb.

Dimmer 
Many bulbs are not compatible with dimmers.  This is not a concern for our trailer though.

Quality Considerations
1. Voltage Regulation
In some campers, the voltage supplied to the lights varies depending on whether or not the camper is "charging" or not.  LEDs are very sensitive to voltage changes so many have built in voltage regulators.  This will be evidenced in the stated voltage tolerances.  Some users installed voltage regulators to their light circuits, particularly to those bulbs that cannot handle a wide range of voltages.

LEDs also dim over time. The regulator is supposed to compensate for this.

2. Heat dissipation
Heat dissipated by heat sink at base of bulb so installing it in an enclosed housing will slowly kill the bulb and they will get dimmer over time.

3. Polarity Protection
Some LED bulbs have circuitry that prevents damage if the bulb is accidentally installed in reverse.

Brands / Items
Starlights Inc. has a phone number but no one answered or called back for tech support. Starlights website says their products cost more because they are higher quality.  I appreciated that they included the following information on their website.
  • Components on the circuit board is often assembled by hand because its still too complicated for factory machines.
  • The actual LED wafer can cost as much as $8 a unit.
  • The brightest LEDs generate blue light. So in order to get the more natural white glow, manufacturers typically coat the bulb with yellow phosphor, an expensive rare earth metal compound imported from China.
  • LEDs additionally require the use of drivers to convert energy into electrical current. This component alone can cost up to $4.
  • Although LEDs burn cooler than Edison bulbs, they still need a conducting material to dissipate the heat. The aluminum used to accomplish this can cost as much as $3.

Revolution 921- 160 NLRevolution 921- 250 NL
Starlights 921-160 NL and 921-250 NL 

      
Starlights 1141-280 and 1141-250

SuperBright LEDs have a big online store with the Live Chat feature. They provide detailed specifications for their LEDs on their website.

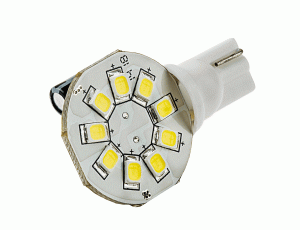
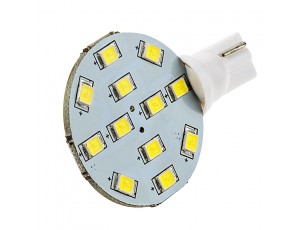
921 LED Bulb, 9 LED Disc Type Wedge Base LED Bulb921 LED Bulb, 12 LED Disc Type Wedge Base LED Bulb
SuperBright LEDs WLED-WWHP9-DAC and WLED-WWHP12-DAC


The M4 website is not as easy to navigate. They do have a wealth of helpful information that indicates their product is well made.  The prices also seemed very good.  They have an elite series which seem to provide more brightness than the standard.


 M4 921-17-5630 and 921-24-5050

GRV does not have a website to speak of and the quality is questionable. They are conveniently sold on Amazon however, and the reviews are overall pretty good.  For the price and the amount of these bulbs I need, the risk was worth the cost. I was able to get 2 day free shipping on these with prime - just in time for our trip to Alabama!  The color range is listed as 3000-3500 Kelvin so there may be more variability with these products. Since I bought a package of 10 they should all be manufactured in the same lot.  I did have to flip them to make some of them work.  The color was a tiny bit bluer than the Brightech 1141's I put over the stove, but the difference was negligible to me.


GRV TL-1350

Brightech has a good website and very good warranty - 10 years on all their LEDs.  Their prices are very reasonable, and they are also conveniently sold on Amazon.  I was able to get 2 day free shipping on these also!  They were bright and the color was excellent.  


Brightech LEDBA15sWW

So far, I am extremely happy with my LED purchase!

Friday, January 15, 2016

Climbing shoes broke my feet

At the repeated insistence of a friend, I first tried climbing in 2007.  That night at the gym, I fell in love and I've been climbing ever since.  A year or two in I was ready for shoes that had edging capabilities.  I did a lot of research and asked experienced climbers for advice.  At the time I was focused on sport climbing and I chose the popular La Sportiva Muira.  Choosing the size was a lot more difficult than picking out the shoe since there is no where to try on climbing shoes locally (or even within a 150 mile radius) so I made an educated guess.  Most women sized down 1.5 euro sizes, so I did the same. When they arrived, I was immediately worried about how hard they were to get on and how tight they were once on.  I showed the fit to some of the experienced climbers in the gym and they assured me that mine fit exactly how climbing shoes were supposed to fit, that it's normal for the shoes to hurt at first, and that they would break in.
Sure enough, the shoes did "break in" and they became my best friends. I loved that I could customize the tightness of the entire shoe and with quick laces I could get them on and off quickly. Eventually, they wore down to the point that it was time for a resole. I couldn't live without my beloved Muiras so I bought a second identical pair.  I thought it strange that a brand new pair of identical shoes felt great on my feet right out of the box, while the original pair initially felt like Chinese foot binding. I chalked it up to manufacturing variability and continued loving my Muiras, resoling each pair several times.  

I started bouldering more and I found that the more I bouldered, the stronger I felt on rope.  I love the comraderie of bouldering, the focus on movement and achieving goals, and the effect on my body. I started looking for a slightly more aggressive shoe. On my next visit to the New (one of the few places in the Southeast with a large climbing shoe stock), I tried on the Solutions first because it's such a popular shoe with local boulderers. I really wanted to love them, but they did not feel good on my feet. I tried on shoe after shoe but nothing felt right.  Finally the rep suggested Katanas. They were more aggressive than the Muiras and they fit like a glove!  I went with the tightness I was accustomed to and bought the same size (38) as my Muira laces.  


Sometime in the next year, I began having pain in the joint of my big toe.  I've gotten plenty of comments about my "bunions" over the years, but I always refused to call them that.  "I just have boney feet!  It's genetic!"  When the pain became so unbearable that it was difficult to walk however, it became obvious that I do have something more serious going on at the joint. I went to a foot specialist who x-rayed my foot.  He pointed out how the metatarsal (foot) bone has shifted outward and my toe has shifted inward.   He told me that the joint could continue to get worse until the joint has to be fused together and that I will need surgery to prevent that from happening.   I was shocked. I was too scared to stick a needle in my foot for a cortisone injection so I left with nothing other than a resolve to try to heal my foot on my own and at some point get some additional opinions.

I began researching bunions, hallux valgus, hallux rigidus, and climbing shoes.  From my own experience I know that repeated flexing at the toe joint significantly exacerbates the problem. This leads me to believe that carbon fiber shoe inserts could be useful in keeping the joint stabilized and therefore inflammation minimized. My first step, however, was to do something about my climbing shoes. On the next trip to the New, every climbing shoe I tried felt terrible on my toe joint. In the end, my beloved Katana in the next FULL size up felt the best without feeling floppy.  I hoped that I could keep climbing after biting the bullet and buying ANOTHER expensive pair of climbing shoes after only one year.


Once my bunion pain stopped flaring I began climbing in my "big" Katanas.  I was relieved to find that the pain was significantly diminished and the larger size shoes didn't hold me back AT ALL.  


Next I focused on my everyday footwear.  For my entire life, I've mostly avoided anything pointy, anything high heeled, and anything that digs into the toe joint. Since this toe pain though, my shoes have been even more limited; I wear only Keens, Chacos, and Danskos. The Chacos were an expensive mistake because they strangled my big toe but frequent loosening helped. When I finally got a pair of Danskos I came to understand why my mom now wears them 24-7.  Danskos are the only shoe I've tried that has enough rigidity to limit the toe joint flex (and therefore toe joint pain).  
I happened to run across an orthotic shoe store and learned that I have very high arches. I walked out with some expensive custom inserts that support my arches but also take up more space in my shoe.

I also needed something to support my feet in my house, especially since most of our floors are wood.  The support of Oofos was amazing, but because my big toe is so close to my second toe the toe thong hurts (a problem I have with any flip-flop with a non-fabric thong).  


Oofos Original
A few weeks later I finally got to try on the clogs at another local store and they were heavenly!  I only wear them inside my house so that they stay clean and no one can point and laugh at the frumpiness (my fashionable mom would surely be one of them).
Oofos Clog

Although I've kept the joint pain at bay with these measures, it still flares and reminds me that the problem has not gone away. Recently I jumped in the trampoline with my boys barefooted and afterwards I suffered the consequences. I could hardly bear to walk for a few days.  

Looking back to the beginning of my climbing obsession, I think that first pair of super - tight Muiras (perhaps helped by my genetically "bony" feet) may have caused my bones to shift over time. That would explain why the second pair didn't have to be broken in. 

We need more voices saying you don't need painfully tight shoes to be a good climber! Buying shoes so tight and hoping that they will break in could break your foot instead of breaking in your shoe.


(For anyone looking for this data, I wear an 8 1/2 in hiking shoes, 8 in other street shoes, and I originally bought size 38 in my first 3 pairs of climbing shoes.  I am currently climbing in size 39 Katanas). 

Sunday, August 25, 2013

Chickpea Waffles


I'm still obsessed with chickpeas.  So much so that I made a trip to 14 Carrot and purchased some chickpea flour.  Lukas is not allergic to wheat (thank goodness) so we haven't had to go gluten free. But if chickpeas taste that good in baked goods (see cookie recipe), then why not make breakfast containing this tasty, nutritious ingredient?  This recipe is so healthy that you won't believe how good they are.

The entire family loved these waffles.  I'm the pickiest one of the bunch and these were the best waffles I've ever made.  I love the subtle flavor of the chickpeas and the sunflower seed butter!

I've adjusted this recipe to make 12 small square waffles which will hopefully be enough to satisfy our family of 4 next time I make them!

(A note to the food allergic - I researched Bob's and found that the facility is gluten free but not nut free.  They run the non allergen products first and then clean after the allergen products, but Lukas did start itching after eating the waffles.  My next step is to figure out where to get some chickpea flour processed in a nut free facility!)

2 cups garbanzo bean (chickpea) flour (add a tad more if too runny)
2.4 cups soy milk
juice of one small lemon
1.5 tsp ginger
1/4 tsp salt
3 tsp baking powder
3 TBL sunflower seed butter
1 - 1 1/2 bananas, mashed (microwave for 45 seconds to soften if not already overripe)
pinch of orange zest or a few drops of orange extract (optional)

Since this recipe does not contain oil, it's imperative to coat the waffle iron WELL before pouring in the batter.  These were delicious with some raspberries on top, but all we had left by the time I took a picture were some mangoes!  Enjoy!